
Appearance
Devices & printing
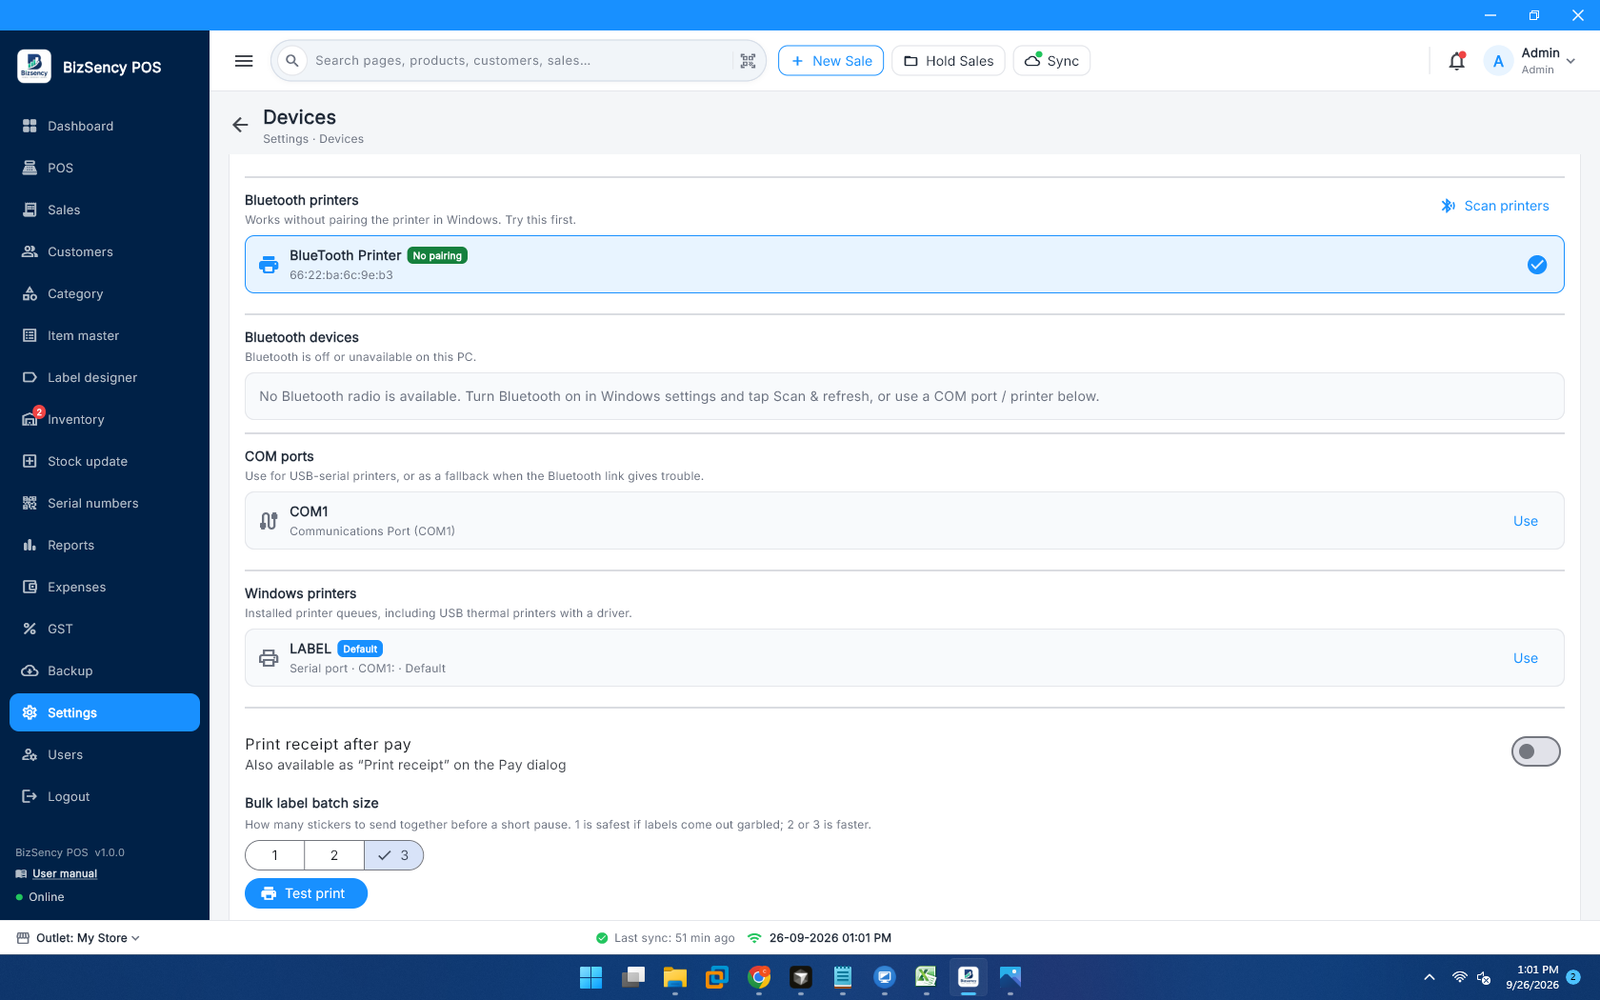
Connect barcode scanners and receipt/label printers, then control when and how receipts print.
Settings → Devices (and Settings → Receipt for logo/name on the bill).
Overview
mermaid
flowchart TD
  A[Settings Devices] --> B[Scan barcode into cart]
  A --> C[Choose printer transport]
  C --> D[BLE Scan printers]
  C --> E[Bluetooth devices]
  C --> F[COM ports]
  C --> G[Windows printers]
  A --> H[Print after pay]
  A --> I[Label batch size]
  A --> J[Test print]
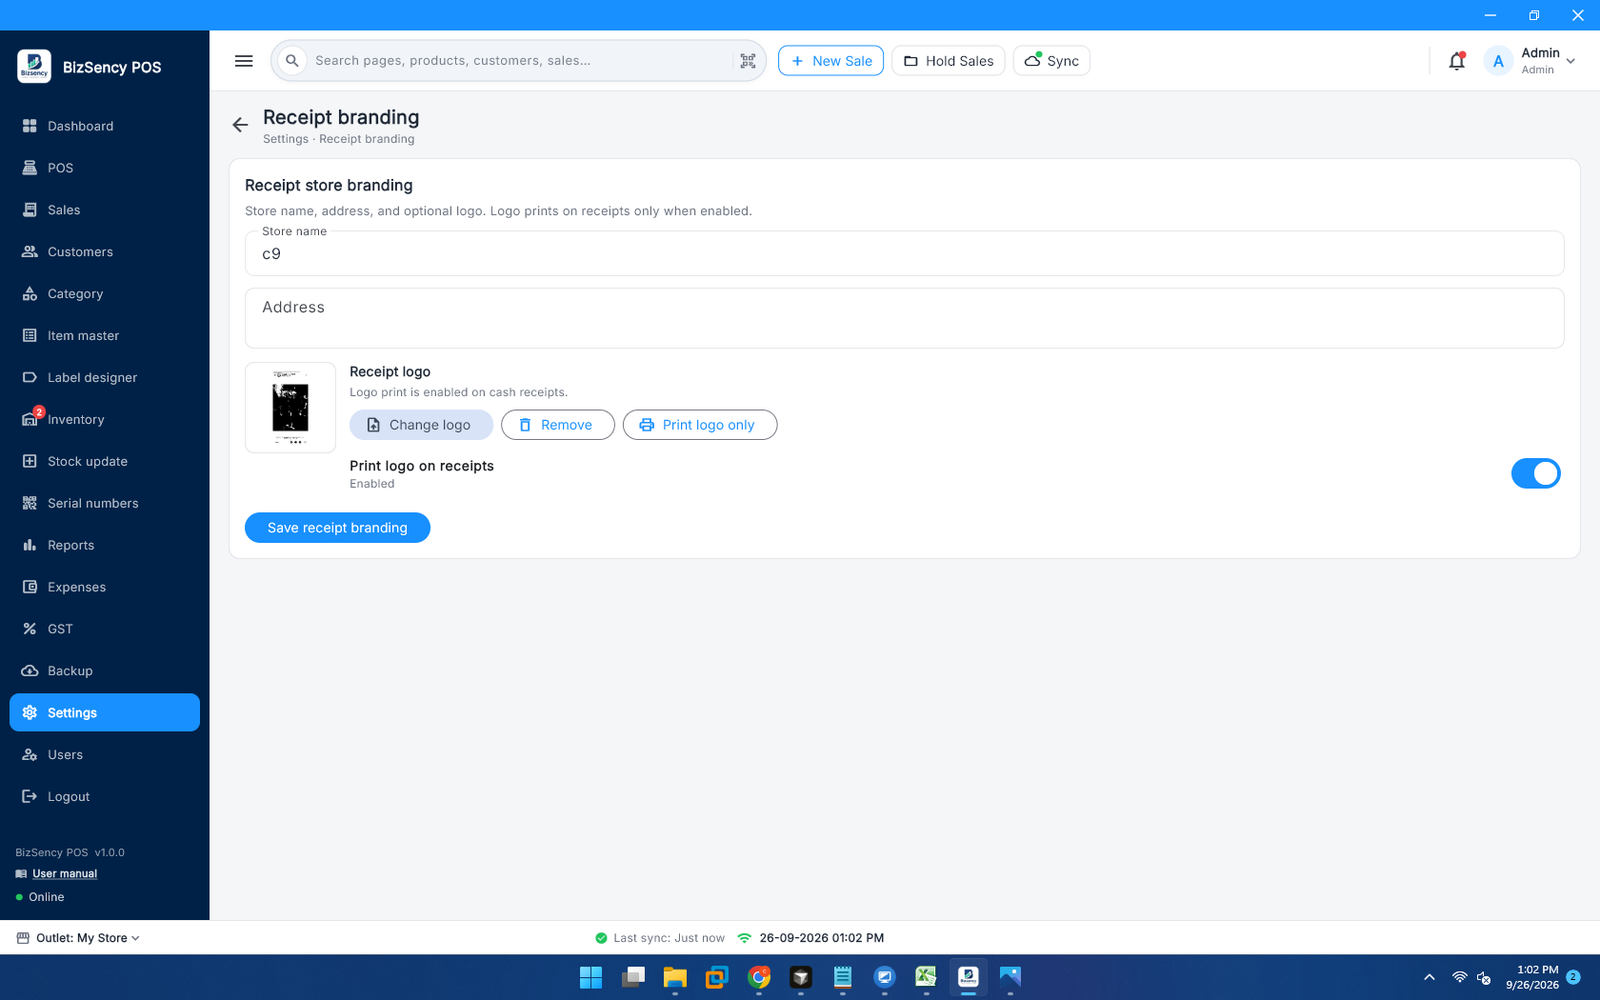
  K[Settings Receipt] --> L[Store name address logo]
Only one printer selection is active. Whatever you pick is what prints — the app does not silently switch transports.
1. Barcode scanner (device connection)
Scan barcode into cart
Settings → Devices → Scan barcode into cart
| Setting | Effect |
|---|---|
| On | USB / Bluetooth HID scanner: barcode + Enter adds the product on POS |
| Off | Scanned text goes into the focused field only (search boxes, forms) |
Tips for scanners
- Plug in or pair the scanner as a keyboard (HID).
- Leave Scan barcode into cart On for counter selling.
- Put focus on POS (not a random text box) before scanning.
- Scanner must send a terminating Enter (most do by default).
- For serial/batch numbers, use the Serial numbers / POS serial step — product barcode adds the item; serial is chosen separately. See Serial numbers.
2. Choose a printer (connection types)
Tap Scan & refresh at the top of Devices to reload Bluetooth, COM, and Windows lists.
A. Bluetooth printers (BLE) — try first
Thermal printers that work without Windows pairing (GATT).
- Power on the printer; keep it near the PC.
- Disconnect it from phones / other apps.
- Tap Scan printers.
- Select your printer in the list.
Best for many 2-in-1 portable thermal printers.
B. Bluetooth devices (classic / paired)
Paired and nearby Bluetooth devices (RFCOMM).
- Put the printer in pairing mode if needed.
- Tap Scan & refresh.
- Pair from the device tile if shown as “Not paired yet”.
- Select the device as the active printer.
Clear paired removes remembered Bluetooth pairings (use if a ghost device blocks connect).
Multiple Bluetooth adapters
If the PC has more than one Bluetooth radio/dongle, Windows may keep pairings on only one. Unplug spare dongles, then Scan & refresh.
If Bluetooth is off: turn it on in Windows, then refresh.
C. COM ports
USB-serial printers, or a Bluetooth printer that exposes a COM port.
- Ensure the COM port appears (Device Manager / printer “Create COM port” if needed).
- Select the COM port tile in Devices.
- Use as fallback when Bluetooth is unstable.
D. Windows printers
Installed printer queues (USB driver, network printer, etc.).
- Install the driver in Windows if needed.
- Select the queue under Windows printers.
- Avoid virtual queues (Print to PDF, OneNote, Fax, XPS) for real receipts — they are treated as non-printers for POS.
3. Print settings
Print receipt after pay
| Setting | Effect |
|---|---|
| On | Automatically print when a sale is completed |
| Off | No auto print — use Pay dialog Print receipt or reprint from Sales |
Also available as a checkbox on the Pay dialog for that sale.
Bulk label batch size
How many stickers to send together before a short pause (Label designer / serial label print).
| Value | Use when |
|---|---|
| 1 | Safest — labels come out garbled or Bluetooth drops |
| 2 | Balanced |
| 3 | Fastest — printer keeps up reliably |
Test print
- Select a printer (BLE / Bluetooth / COM / Windows).
- Click Test print.
- Confirm paper feeds and text is readable.
If Test print is disabled, no valid printer is selected yet (hasPrinter is false).
4. Receipt branding (print content)
Settings → Receipt
| Item | Purpose |
|---|---|
| Store name | Header on receipts |
| Address | Printed under the name |
| Logo | PNG/JPG upload |
| Logo enable switch | Include or skip logo on cash receipts |
| Change / Remove logo | Update or clear file |
| Print logo only | Test logo without a full sale |
Flow:
- Enter store name and address; save branding.
- Upload logo → enable logo print.
- Print logo only or complete a test sale with auto-print On.
5. Recommended setup order
- Connect scanner → enable Scan barcode into cart.
- Prefer Scan printers (BLE); else pair Bluetooth / pick COM / Windows queue.
- Test print.
- Turn Print receipt after pay On for the counter.
- Set Receipt name + logo.
- For label printers, start batch size at 1, raise to 2–3 if stable.
- Optional: enable Keyboard shortcuts.
Troubleshooting
| Problem | What to try |
|---|---|
| Nothing prints | Select a printer tile; Test print; check paper and power |
| BLE list empty | Printer on, near PC, not connected to phone; Scan printers again |
| Bluetooth connects then fails | Unplug extra dongles; Clear paired; retry; try COM or BLE |
| Garbled labels | Set batch size to 1; move closer; reduce interference |
| Scanner types into wrong field | Click POS background; ensure Scan to cart On; finish any open dialog |
| PDF / OneNote selected | Pick a real thermal or USB receipt printer instead |
| Logo missing on receipt | Receipt → logo uploaded and logo switch On |